Wheat Scouting 101
Nearly 90 grain traders, government officials, reporters, millers and even a few farmers start the 2018 Wheat Quality Council’s Hard Winter Evaluation Tour on April 30. Over the next three days, they will canvass the state’s wheat crop from Manhattan to Colby to Wichita and back again. Along the way, they will stop every 15 miles or so to estimate yields in wheat fields on their routes. At the end, the results will be compiled into a yield estimate average for the Kansas hard red winter wheat crop.

But, you do not have to be on the tour to scout wheat fields and make your own estimates. To help, we have compiled the steps participants will use to estimate yields so you too can participate. Justin Knopf, wheat farmer in Saline County, provided some helpful hints he and other farmers use when evaluating their fields.
What You Need:
- One yard stick (a ruler will work in a pinch).
- One writing utensil and notepad.
- One calculator (the one on the phone will suffice).
- The wheat yield formula (see below in the story).
Optional:
- A pocket knife to slice open wheat in the boot stage to examine the wheat head.
- The KWYC (Kanas Wheat Yield Calculator) app, downloaded onto your smart phone.
- A camera to capture an overall view of the wheat field (the one on the phone is fine).
How to Estimate Wheat Yield and Conditions:
Step 1: Find a wheat field. If you are not a farmer or landowner, call a farmer friend or the Kansas Wheat Commission. Above all else, be respectful of other people’s property.
Wheat Tour Tip: Do not enter a fenced field, just as you would not enter a fenced yard in town.

Step 3: Observe general field conditions. Do you see weeds? Does the field have an odd color (yellow or blue)? Is the wheat stand uniform or are there bare patches in the field? How thick or thin is the canopy (where the leaves from one row touch the other, same as in a forest where the trees touch each other)?
Wheat Tour Tip: Old farmer’s scouting trick: Throw a hat into the field. If the wheat holds it up, it is generally a good, thick stand. Watch the wind!
Wheat Tour Tip: Color can be an indicator stress, which will reduce yield. A yellow cast can indicate a lack of nitrogen or drought stress. A blue cast indicates drought or heat stress.


Step 4: Measure the height of the wheat plant. By this time of year, wheat should be well above your knee.

Step 5: Examine the wheat head.


While the above steps help gauge the general health and conditions of the wheat field, the next steps will be how you formulated projected yield. So, get out your handy yardstick!
Step 6: Measure the distance between wheat rows in inches. Record on your yardstick or notepad.
Wheat Tour Tip: The most common spacing between rows is 7.5 or 10 inches.
 and count how many stalks are present in the first 12 inches.")
Farmer Tip: Officially, for the Wheat Tour, all stalks should be counted. However, Knopf said that secondary tillers (short ones that will feel more like a blade of grass than solid like a tree trunk) are unlikely to mature in time to produce grain at harvest. You decide.
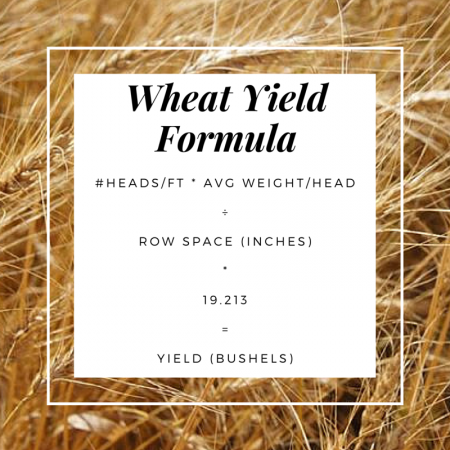
Step 8: Calculate yield, using one of two methods.
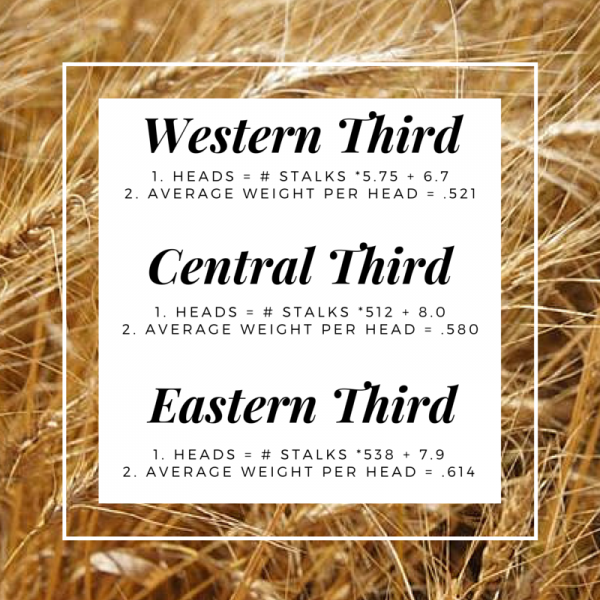
- Select the appropriate formula depending on whether you are in the western, central or eastern third of the state.
- Calculate heads per foot, per the formula.
- Multiply the number of heads per foot by the average weight per head, per the appropriate formula.
- Divide by row spacing.
- Multiple the result by 19.213. Why 19.213? Ask someone more educated than us!
- Congratulations! You have calculated projected wheat yield.

Method 2 – Use the app.
- Download the KWYC app onto your smartphone.
- Enter the Field Name. Get creative like “Wind Turbine” or just enter something basic like “Field 1.”
- Enter the county where the field is located.
- Optional information: Field size or any observational notes from before.
- Hit Save.
- Select the field you just created and select New Sample.
- Enter the Feekes stage of growth. The app has pictures.
- Enter row width.
- Enter stalks per foot.
- Optional information: Height or a picture of the field.
- Hit Save.
- Re-click on the sample you edited to see projected yield according to three different formulas: Kansas Wheat Alliance, Crop Insurance and Kansas State University.
Step 9: Share your results!
Participants on the Wheat Tour will be tweeting results straight from the field using the hashtag #wheattour15. If you are not on Twitter, share the results with us at Kansas Wheat any way that your prefer – Facebook, e-mail, postcard – we will take them all!
Originally published May 4, 2015, Written by Julia Debes